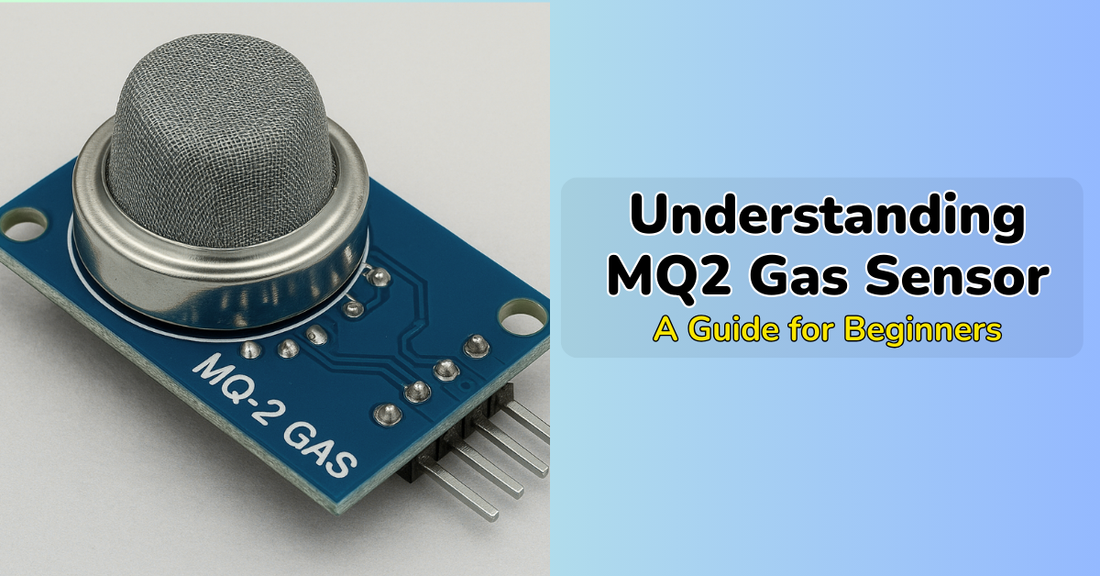
Understanding MQ2 Gas Sensor: A guide for Beginners
IEM RoboticsTable of Content
- What is MQ2 gas sensor?
- Specifications of MQ2 gas sensor
- How does mq2 sensor work
- Pin configuration of MQ2 gas sensor
- The MQ2 gas sensor circuit diagram
- Applications of MQ2 gas sensor
- Interfacing MQ2 sensor with Arduino
- Calibrating the mq2 gas sensor
- Limitations of the mq2 gas sensor
- Project ideas using mq2 sensor
- Conclusion
The MQ2 gas sensor or Metal Oxide Semiconductor (MOS) type sensor has always been a thing of understanding for the beginners. This sensor is known for helping with gas detection for environmental reasons.
Whether detecting a gas leak in your kitchen, or a building, you need a reliable as well as an affordable sensor. Popular among engineers, students, and hobbyists, the MQ2 is a multipurpose tool that can identify a range of flammable gases, such as smoke, LPG, methane, and hydrogen.
The MQ2 sensor is renowned for its ease of use and efficiency in identifying even minute gas concentrations.
It is also perfect for do-it-yourself electronics projects and prototyping since it integrates easily with microcontrollers like Arduino and Raspberry Pi. Because of its remarkable sensitivity and broad detection range, despite its small size, it is frequently found in air quality monitors, alarm systems, and smart home appliances.
This blog will walk you through everything you need to know about this sensor, along with how it can be a part of DIY projects.
What is MQ2 gas sensor?
MQ2 is a metal oxide semiconductor (MOS), which is a type of gas sensor. The series it is a part of consists of various other models such as MQ3, MQ5, and MQ7. Different kinds of gases are detected with the help of these sensors. Following is the list of things that mq2 gas sensor is designed to detect:
● Smoke
● LPG (Liquefied Petroleum Gas)
● Methane
● Propane
● Hydrogen
● Alcohol
This sensor is affordable, along with being easy to find. It is commonly used in hobbyist projects for example gas leak alarms, smoke detectors and even smart home systems.
Specifications of MQ2 gas sensor
The mq2 gas sensor has several technical specifications that you should keep in mind when working with it for a non-faulty output. Following is the list of all the specifications
● Detection range: The range up to which it can detect gas is 200 ppm to 10,000 ppm
● Operation voltage: It needs 5V DC to operate
● Response time: The average time it takes to respond is less than 10 seconds
● Preheat time: The average preheat time is up to 20 seconds; however, for full calibration, it is 24 hours
● Recovery time: The average range is less than 30 seconds
● Sensitivity: It is highly sensitive to combustible gases
● Output: Depending on the module that you have, the sensor can either be analog or digital.
This particular module also includes a comparator and a potentiometer, which allows you to adjust the threshold when you are using it with a digital microcontroller input.
How does mq2 sensor work
This sensor essentially works on the principle of resistance variation. A tiny heating element, along with a chemically sensitive layer, which is typically composed of tin dioxide (SnO₂), is located inside the sensor. SnO₂ has a strong resistance in pure air. The resistance drastically decreases when exposed to gases such as propane or methane.
The sensor then measures this change in resistance and transforms it into an analog signal. When the concentration rises above a predetermined level, the onboard electronics (in modules) can also provide a digital signal. To understand it in simpler terms, here is a breakdown:
1. More gas leads to lower resistance, which thus leads to higher output voltage in analog circuits
2. If the gas concentration is more than the threshold, then the digital output is high
Pin configuration of MQ2 gas sensor
Essentially, the sensor comes in 2 types, which are the sensor module and the standalone sensor. Most of the DIY projects that you will do use the sensor module. This module has the following 4 pins:
● VCC: The power supply is 5V
● GND: Ground
● DOUT: Digital output
● AOUT: Analog output
You can expect variable voltage based on the gas concentration from the analog output. Meanwhile, the digital output either goes high or low depending on the threshold that is preset.
The MQ2 gas sensor circuit diagram
Once you know what a MQ2 gas sensor does, you will be better able to understand its applications with the help of the circuit diagram.
Components that are required:
● mq2 gas sensor module
● Arduino uno
● Buzzer or LED
● Resistor
● Breadboard and jumper wires

Applications of MQ2 gas sensor
This sensor is versatile and thus is ideal for various applications. Following is a list of things you can do using this Gas sensor.
• Smoke Detection: It is generally used in fire detection systems since it can sense the smoke particles, which thereby makes it ideal for affordable smoke alarms
• Gas leak detection: Finding methane or LPG leaks in industries, cars, or kitchens is an important safety precaution. If a leak is found, MQ2 sensors can sound an alarm or even close gas valves.
• Monitoring air quality: Even though it is not as accurate as compared to the industrial sensors, this Gas sensor can be used to detect basic air quality, especially if you want to detect if there are combustible gases.
• Smart home automation: MQ2 sensors and microcontrollers can be combined in smart homes to use IoT platforms to alert homeowners to dangerous air conditions.
• Educational project: The MQ2 offers a practical approach for learning gas detection, analog-to-digital conversion, along with microcontroller interfacing for students and enthusiasts.
Interfacing MQ2 sensor with Arduino
For basic gas detection, you need to connect the gas sensor to an arduino board. Following are the steps which will guide you through doing that-
Hardware that you will need:
● Arduino Uno
● Jumper wires and breadboard
● Mq2 gas sensor module
● This is optional but either an LED or a buzzer for alarms
Wiring diagram:
MQ2 Sensor | Arduino
------------------------
VCC | 5V
GND | GND
AOUT | A0
DOUT | D2 (optional)
Arduino code example:
int analogPin = A0; // MQ2 analog output connected to A0
int digitalPin = 2; // MQ2 digital output
int gasLevel;
void setup() {
Serial.begin(9600);
pinMode(digitalPin, INPUT);
}
void loop() {
gasLevel = analogRead(analogPin);
Serial.print("Gas Level: ");
Serial.println(gasLevel);
if (digitalRead(digitalPin) == HIGH) {
Serial.println("Gas Concentration High!");
}
delay(1000);
}
Threshold tuning:
You can adjust the sensitivity of the threshold using the onboard potentiometer, which is there on the sensor module. If you turn it in the clockwise direction then it lowers the threshold thus making it more sensitive.
Calibrating the mq2 gas sensor
If you want repeatable and reliable results, calibration of the sensor is essential. The following are the steps on how to do a basic calibration:
• Preheat the sensor: In order to get stable results, it is important to let the sensor warm up for at least 24 hours in clean air. The tin dioxide layer should be stabilized through the built-in heater.
• Use reference glass: You can expose your sensor to known concentrations of target gases (such as 1000 parts per million of methane) and record the analog results for accurate calibration.
• Calculate the R₀ value: The sensor resistance in clean air is denoted by R₀. In formulas for gas concentrations, it serves as a baseline. Once you know R₀, you may use the logarithmic graphs in the datasheet to determine gas concentration from Rs/R₀ ratios.
Limitations of the mq2 gas sensor
While the MQ2 sensor is versatile, there are certain limitations to it. The following are some of its limitations:
• Cross-sensitivity: Since it detects various gases, there is a chance of false positives or inaccurate detections. For example, it might get triggered because of alcohol, even though there is no presence of propane or methane.
• Temperature and humidity sensitivity: As the environmental conditions change, so can the readings of the sensor. Therefore, calibrations may need to be adjusted over time.
• Analog drift: If it is not calibrated regularly, then it might start giving inconsistent readings.
• Consumption of power: It is less ideal for battery-operated devices since the internal heater consumes a lot of power. Thus, it needs to be designed effectively.
Project ideas using mq2 sensor
If you are looking for ideas and inspiration, here is a list of projects that you can try out:
1. Smart kitchen safety system: It can detect smoke as well as gas leaks. Additionally, it notifies you about it through SMS or an app. It even triggers off alarms or automatic shutoff valves.
2. Fire detection robot: Through using motors and sensors, you can use MQ2 to detect any smoke and navigate the robot towards the source.
3. Portable gas analyzer: This small device is powered by Arduino and OLED to detect the gas levels in your surrounding air
4. IoT air quality monitor: If you want to monitor the air conditions of an indoor area, you can do so by uploading the real-time data onto a web dashboard.
Conclusion
A useful, reasonably priced, and user-friendly part for identifying smoke and flammable gases is the mq2 gas sensor. It's an excellent tool for experimenting with environmental sensing and safety systems, regardless of your background—student, enthusiast, or engineer. It is an essential component of many electronics projects due to its sensitivity, ease of use, and adaptability.
But be mindful of its limitations, particularly if you require industrial-grade performance or great accuracy. The MQ2 sensor can assist you in creating robust gas detection systems that support safer households, smarter cities, and creative educational opportunities with the right calibration, integration, and imagination.


